Showing posts with label DIY. Show all posts

Tuesday, October 31, 2017

It's the Great Eye Ball, Niko Man

Tuesday, October 31, 2017


Happy Halloween!!
I love Charlie Brown and my sister calls my little man Niko Man, hence the title. 
I decided that I wanted to make cake pops for Niko's class, OMG! So I made them. I've made cake pops before but I never really cared what they looked like a whole lot because they were mostly covered in sprinkles.  This time I decided to make creepy eyeballs.  So . . . TA DAAAAAH.  I was able to make about 13 "ok" ones but though not perfect I am still happy with how they turned out as I am not a professional baker at all.  I've decided to show you pictures of behind the scene.  No one shows you the behind the scene pics, lol.
I hope the kids like them, they were yummy.  I ate one of the ruined ones, whoops.  Whenever I make the cake pops I kind of just wing it, so I bake a box cake, cool it, crumble it and add 1/4 of a jar of frosting, mix it, squish it and mold it.  Dip the lollipop sticks into the melted candy melts and attach to cake pops and let cool, this acts a glue to hold it together.  Dip and decorate.  I have a candy melt pot that I bought at Michaels, even though they are never perfect I make them enough to where I think I need one.  This was my first time using it.  I think I still need to perfect the actual cake ball, the weight and size is important so that they are not too heavy for the stick otherwise they'll fall off . . . see science, math and physics are all important kids! Stay in school!  
Hope everyone has a safe Halloween!
Go 'stros!

xoxoxo

Final product

These broke off and fell inside candy melts

Ruined

My first attempt the night before using a different brand of candy melts um no . . . these DID NOT make the final count.


Clean up

A MESS!

Sunday, October 30, 2016

Cake. Cake. Cake.

Sunday, October 30, 2016

I love babies and it seems like a lot of my friends do too. I've been to 4 baby showers this year so far and two more to go! 

I decided to make a diaper cake out of some of Liam's leftover diapers. We are onto size 2 and had a bag of size 1 left. It was super easy! I looked up different tutorials but they all involved rolling the diapers and all this extra stuff. No thank you. So what do you use to bake a cake? Baking pans and bowls! So that's what I used to arrange the diapers. It was super easy! Then I used rubber bands to hold them together and ribbon to decorate. It literally took like 11 minutes. I added pearl stickers to the ivory ribbon and used some gold accent ribbon on middle tier. I used hot glue to glue to ribbon and I used double sided tape to stack the tiers. Super duper easy!

Now you can make yours too without paying the hefty price tag!


Tuesday, December 17, 2013

DIY: Ugly Christmas Sweater 2013

Tuesday, December 17, 2013

Last weekend my friend, GG, had her annual Christmas party at St. Arnold Brewery.  It was a lot of fun.  Just a cool place to hang out and chill.  You need to make sure to get there early to grab a table. Admission is $8 and you get 4 tokens and a complimentary glass.  Each bear is one token.  Being pregnant I tried to get out of paying the $8 but I still had to pay.  GRRR.  It's ok though, I actually enjoyed their root beer.  I generally hate root beer but the St. Arnold root beer was so refreshing and delicious.  It's caffeine free and they use real sugar instead of high fructose corn syrup.  It's free with admission so I gave my hubby all my tokens.  Needless to say he couldn't drive home afterwards. 

Once again I decided to make my own ugly sweater.  I think I like last year's sweater better though. It took me 10 minutes to make this sweater.  All you need is a glue gun and random Christmas stuff.  I bought the vest at a thrift store, washed it, dried it, then added green tinsel in the shape of a Christmas tree, glued dollar store present ornaments at the bottom and then glued random Christmas ribbon and brown stones throughout.  I also used paint to decorate the tree.  The brown stones looked a little like poo but that's ok. 

Last year V wore a snowman sweater he made.  This year I just added a reef that I made out of the same green tinsel and I added Christmas ribbon in the shape of suspenders.  Then I glued random stuff  onto the sweatshirt.  The sweatshirt was also from a thrift store and I shrunk it not only making it ugly but ill fitting as well. 

We'll see what we all wear next year!


Monday, June 3, 2013

Hello DIY

Monday, June 3, 2013

This DIY was inspired by my friend D, who loves Hello Kitty. My like for Hello Kitty is circumstantial. Every year for the last three years my former boss got me a Hello Kitty cake. Mostly because she loves Hello Kitty. I have a Hello Kitty robe because it's the only one that fit at TJ Maxx and I have a Hello Kitty doll because last year for Christmas I got it for a friend but I have yet to give it to her so instead it's propped up on my nightstand.

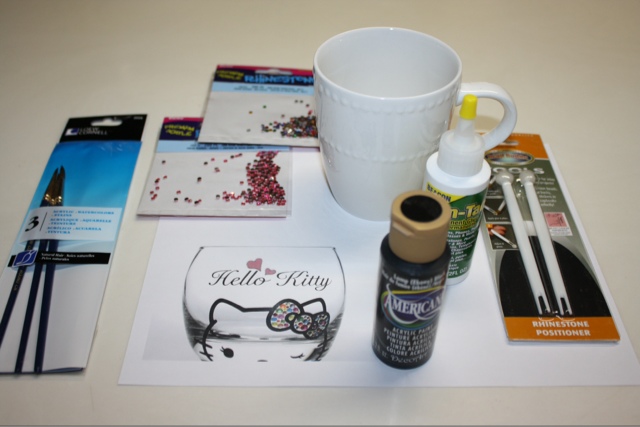
So D, wanted to get me this (see pic) to which I responded I can make that . . and holly molly so can you!


All Materials purchased at JoAnn

Materials
- white mug or glassware of choice
- black acrylic paint (enamel works better if you want to wash it)
- mod podge to set and seal
- gem tac glue
- brushes
- acrylic rhinestones
- hello kitty pattern

Instructions
1. Wash mug and let completely dry
2. Coat mug with mod podge and let completely dry
3. Cut out Hello Kitty pattern.
4. Trace it onto the cup with a sharpie.
5. Let dry for about 15 minutes.
6. Use black acrylic paint and paint the Hello Kitty outline.
7. Clean up edges with a tooth pick if needed.
8. Let dry. I let it dry for 3 hours.
9. Apply a coat of mod podge to seal it and add luster
10. Let dry over night
11. Use rhinestone glue to adhere rhinestones as desired. Use tweezers to apply rhinestones.

Super easy! Enjoy your new mug!

Tea anyone?
What do you think?


Sunday, February 10, 2013

DIY: Bow Tie

Sunday, February 10, 2013

This DIY was inspired by my sister.  She made her boyfriend a bow tie.  A real one.  I decided to make a "pre-made" bow tie.

1. Measure fabric 8 inches long by 6 inches wide for back bow.
2. Measure fabric 7 x 4 inches for the front bow.  I wanted my bows two different sizes.
3.Measure another strip to your neck measurements (this will go around the bow tie and snap in the back).  ie: my neck measures 13 inches (add an inch) so cut a strip 14 x 2, fold in half and sow to have a strip that will be 14 inches long and one inch wide. 
4. Add snaps to the neck strip (click on link on tips on how to add snaps).
5. Measure another smaller portion to join both ties together.  I ball parked this one.
6. Fold fabric from step 1 and 2 as shown in Figure A.
7. Sow each strip as shown in Figure B.
8. Fold the sides in as shown in Figure C.
9. Sow each tie down the middle as shown in Figure D.
10. Superimpose the two soon to be bows as shown in Figure E.
11. Gather the bows with the small strip as shown in figure F. 
12. Sow the back of the strip F-1.  Sow it loosely so that the neck strip can go through
13. Pass the neck strip through the back of the bows.  Sew on tightly.
Voila!

I hope the pictures help clarify the steps.  It's pretty easy.  What do you think?
My sisters legit bow tie

Fabric
Figure A.
Figure B
 

Figure C                                                                
Figure D

Figure E

Sown strip that gathers the two bows together
Figure F
Figure F-1
Neck strip

AlmaKnack © 2014